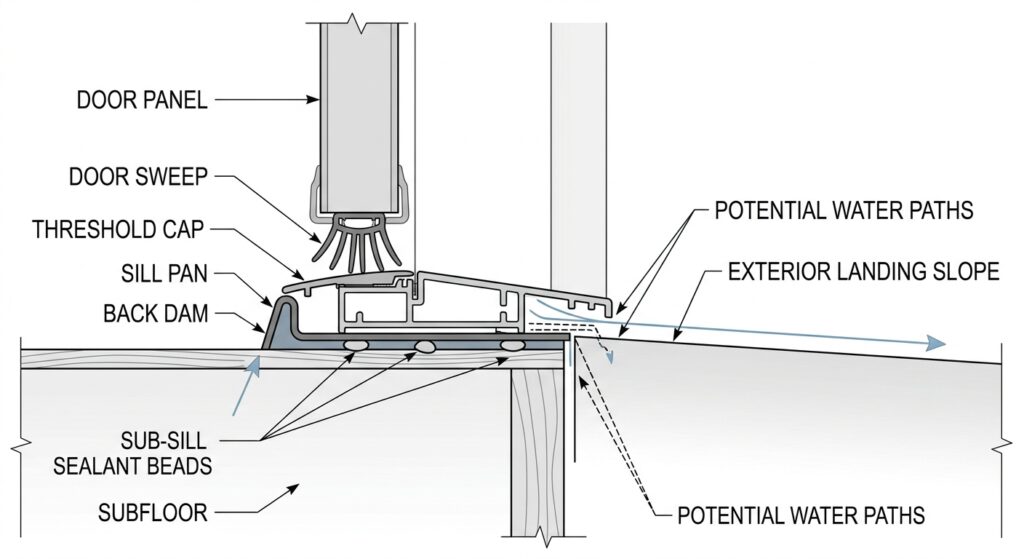
Water coming under an exterior door during rain is caused by gasket or sweep failures, missing or deteriorated sealant below the threshold extrusion, improper sill pan flashing, or excessive exterior water pooling against the door landing. Identifying the exact path requires separating top-of-threshold seal bypass from beneath-the-threshold sub-sill leaks and exterior ground drainage issues.
When rainwater gathers along the interior entryway or dampens the subfloor beneath an exterior door, homeowners often assume the door unit itself or its bottom sweep is completely defective. However, entryways function as integrated water-management systems where the door slab, frame weatherstripping, threshold assembly, sub-sill flashing, and exterior ground slope must all work in harmony to repel bulk moisture.
Water appearing at the base of a door during heavy rainfall typically originates from one of three distinct sources: failure of the door's perimeter gaskets and bottom sweep, missing or compromised installation sealant underneath the threshold extrusion, or site-drainage issues that allow standing water to overwhelm the exterior landing. Systematically tracing the water path prevents unnecessary door replacements and stops concealed moisture damage inside the surrounding floor structure.
Related Pane & Hinge guide: How to Diagnose Drafts and Visible Daylight Around an Exterior Door.
What to Observe Before Taking Action
Before applying caulk or attempting to adjust hardware, observe the precise behavior and location of the water during or immediately after a rain event. Take note of whether the moisture sits on top of the interior threshold cap or emerges from underneath the base extrusion directly against the interior trim or subflooring. Moisture that sits on top of the threshold cap points toward a problem with weatherstripping, corner seals, or bottom sweeps, whereas water leaking under the aluminum base extrusion suggests a sub-sill or installation flaw.
Check surrounding exterior conditions simultaneously. Observe whether wind is driving rain directly against the face of the door slab, whether gutters or roof valleys overhead are overflowing onto the entrance, and whether water is pooling on the exterior porch, deck, or walkway. Inspect the lower jamb corners for visible light gaps or missing foam corner pads, and note if lower wood casing trim appears soft, discolored, or swollen.
Systematic Diagnostic Sequence and Observation Guide
To isolate the leak without making false assumptions, perform a non-destructive isolation procedure on a dry day using a controlled water source like a low-pressure garden hose turned down or a bucket. Never use high-pressure water streams, as they force water past intentional drainage paths and artificially exceed the home's structural design limits. Begin at the lowest exterior point and work upward, using only enough low-pressure water to isolate the entry path. Stop the test as soon as water appears indoors, and do not continue upward or prolong wetting once the entry path has been identified.
Start by applying water strictly to the exterior landing or slab a short distance away from the door frame to test ground drainage. Next, direct water exclusively to the exterior nose of the threshold extrusion below the door slab. If moisture appears inside beneath the threshold during this step, the result points to a possible problem in the sub-sill sealing or sill-pan flashing system. It does not prove that a concealed component is missing without further inspection. Afterward, apply water across the bottom portion of the closed door slab and sweep to evaluate gasket contact. Finally, direct water to the upper jambs and head drip cap to check whether water is tracking down internal frame channels.
- Top-of-threshold pooling: Indicates worn bottom sweeps, low threshold cap adjustment, or missing jamb corner pads.
- Sub-sill interior dampness: Points to a possible defect in the threshold bedding, sub-sill sealing, or sill-pan flashing system; confirm concealed conditions before deciding on the repair.
- Lower corner jamb wicking: Points to missing corner foam pads, unsealed frame joints, or deteriorating jamb bases.
- Bulk water surge: Caused by exterior hardscape sloped toward the house, flush porch slabs, or missing overhead gutters.
Sources: Source S1 Source S2 Source S4
Common False Diagnoses and Wrong Turns
A common mistake when addressing wet entryways is assuming that adding extra weatherstripping or replacing the door sweep will fix all leaks. If rainwater is entering beneath the threshold base plate or through unsealed sub-sill fastener penetrations, tightening the door sweep against the top of the threshold will not stop moisture moving through the subfloor gap below.
Another frequent error is running a bead of exterior caulk straight across the outer front lip of the threshold extrusion. Sealing this exterior edge can trap water inside or under the threshold assembly, preventing proper drainage. Trapped water accelerates subfloor wood decay and builds hydrostatic pressure that forces moisture into the building. Similarly, assuming the door unit itself is defective is often incorrect; even a perfectly constructed pre-hung door will leak if installed without proper sill pan flashing or positive exterior drainage.
Safe Next Steps Based on Observed Conditions
If water pools on top of the threshold, check the adjustable threshold cap. Some swing-door thresholds have adjustable caps, but the adjustment mechanism and screw direction vary by design. Identify the threshold or door manufacturer and follow its instructions before making small, even adjustments. A sheet of paper can be used as a simple contact check for reasonably even drag across the closed door, but it is not a substitute for the manufacturer’s adjustment specification. Replace worn or torn sweeps and install replacement foam corner pads in the lower jamb corners if they are missing or compressed.
If water emerges beneath the threshold base while top weatherstripping remains effective, the threshold installation requires attention. As an initial temporary measure, interior-side perimeter gaps can be sealed to protect finished indoor flooring. A persistent leak beneath the threshold may require removal and reinstallation of the threshold or door unit so the concealed sub-sill sealing and flashing can be inspected and corrected. The required sill-pan, sealant, drainage, and fastening details vary by door system and opening, so follow the door manufacturer’s current installation instructions and applicable flashing requirements. If concealed flashing, damaged subflooring, or door-unit removal is involved, professional repair is appropriate unless you have the skills and documentation needed for the assembly.
Sources: Source S1 Source S2 Source S3
Safety Note
Safety Note: Do not force a binding door, remove heavy glass units or glazing components, or work at unsafe heights along elevated entryways. Always contact a qualified professional if glass is cracked or broken, if heavy frame hardware is loose, or if a door panel is unaligned and risks falling during inspection.
Addressing Structural Limits and Long-Term Protection
Resolving water intrusion beneath an exterior door requires matching the corrective action to the specific entry path. While minor weatherstripping adjustments and threshold height changes can be performed easily, persistent sub-sill leaks or poor exterior site grading demand structural flashing corrections and ground re-contouring to ensure long-term protection.
If non-destructive testing reveals structural subfloor soft spots, active mold growth in wall cavities, or water descending behind finished drywall, stop DIY troubleshooting immediately and consult a licensed contractor or envelope specialist to prevent further structural damage.
- Observe exact water entry point (above threshold cap vs. beneath threshold base).
- Inspect exterior landing slope to ensure ground falls away from the foundation.
- Verify overhead gutters and drip caps direct bulk water away from the door face.
- Perform a paper drag test across the threshold cap to check sweep compression.
- Inspect lower jamb corners for missing foam corner pads or deteriorated wood.
- Document findings with photos and clear descriptions before calling a professional.