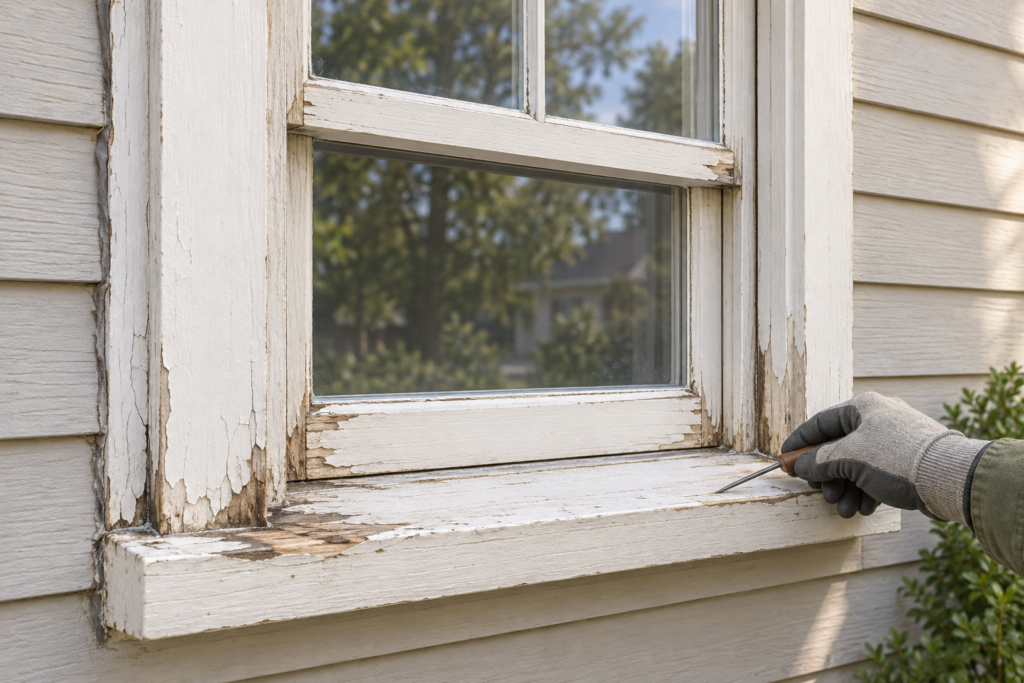
A rotted wood window does not automatically need complete replacement. Repair is usually worth investigating when decay is limited to a sill edge, sash corner, glazing area, or another replaceable component and the surrounding frame remains stable. Replacement becomes more reasonable when decay is widespread, load-bearing connections have lost strength, the opening cannot be made reliably weathertight, or the number of failed components makes repair impractical.
The useful question is not “Does this window look bad?” but “Which parts are unsound, why did they stay wet, and what must be removed or rebuilt?” Peeling paint can identify a place to investigate, but it is not proof that the wood underneath has failed.
Start by finding the water source
Wood decay needs persistent moisture. Before comparing repair and replacement, inspect how water may reach or remain in the assembly. Look at the glazing edge, sash joints, sill-to-jamb corners, frame perimeter, flashing area, and interior condensation pattern. The National Park Service identifies moisture as the primary contributor to decay in wood windows and recommends correcting conditions that let water enter or pond before repair.
Do not assume that staining below a window identifies the exact entry point. Water can travel through frame joints or the rough opening before appearing indoors. Record whether the symptom follows wind-driven rain, occurs during cold-weather condensation, or remains present in dry weather. If moisture is on the room-side glass rather than in the wood, our guide to interior, exterior, and between-pane condensation can help separate those conditions.
Use a component-by-component condition worksheet
Inspect one window at a time and photograph the same areas on every unit. This prevents one severely damaged corner from becoming an unsupported conclusion about the whole house.
| Component | What to record | Finding that favors repair | Finding that needs specialist evaluation |
|---|---|---|---|
| Exterior sill | Paint, checking, slope, ponding, softness at ends and underside | Localized surface damage with sound wood around it | Deep decay across the sill or failed connection to jambs/wall |
| Lower sash rail and corners | Open joints, movement, glazing condition, localized softness | One repairable joint or reproducible component | Multiple loose joints, distorted sash, or insufficient sound material for a splice |
| Jambs and frame | Plumb, attachment, staining, softness, wall movement | Stable frame with an isolated damaged section | Widespread decay, movement, or concealed wall damage |
| Glazing edge | Missing putty/seal, loose glass, water path | Sound sash needing controlled reglazing | Loose or cracked glass combined with badly deteriorated sash |
| Operation and hardware | Whether sash opens, stays supported, closes, and locks normally | Serviceable sash with repairable cords, locks, or weatherstripping | Unsafe unsupported sash or distortion that prevents reliable operation |
| Historic or architectural value | Original material, profiles, glass, craftsmanship, visible elevation | Distinctive material that can be retained through repair or component replacement | Decision requires preservation, code, or design review |
Label photographs by window and component. For a group of windows, count how many sills, rails, stiles, panes, and frames need each class of work. This produces a repair scope instead of a vague “all old windows are bad” estimate.
Distinguish finish failure from wood failure
Blistered, cracked, or peeling paint often points toward moisture exposure, but sound wood may remain beneath a failed coating. After documenting the finish, a qualified evaluator can assess fiber condition and the depth and extent of decay. The National Park Service describes careful probing as one traditional evaluation method, but sharp tools can damage sound historic material, puncture concealed surfaces, or encounter lead-painted debris.
For a homeowner screening inspection, do not aggressively stab or excavate the window. Compare suspect and apparently sound areas using gentle pressure only where access is safe, and stop if the glass is loose, the sash moves unexpectedly, or the surface may contain hazardous coating. A preservation carpenter or window specialist can perform a more controlled assessment and determine whether enough sound material remains for consolidation or a splice.
Choose among four levels of intervention
1. Maintenance and moisture correction
This may fit when the assembly is operationally sound and damage is limited to failed paint, glazing compound, sealant at an appropriate stationary joint, hardware, sash cords, or weatherstripping. The water source still needs correction, and compatible preparation and coating matter. Do not seal drainage openings or moving joints with indiscriminate caulk.
2. Stabilization or localized rebuilding
Partially deteriorated wood may sometimes be dried, consolidated, patched, or rebuilt. Whether this is durable depends on moisture control, remaining sound fibers, geometry, product compatibility, and workmanship. A cosmetic filler placed over damp or actively decaying wood is not equivalent to a structural repair.
3. Splice or component replacement
If a sill end, bottom rail, muntin, or another part cannot be stabilized, a matching piece may be spliced in or the component reproduced while retaining the rest of the window. This usually requires greater woodworking skill. It can be especially valuable where the existing profiles, glass, or craftsmanship contribute to the building.
4. Sash, insert, or complete-window replacement
Replacement is not a single option. A new sash can sometimes use a serviceable existing frame. An insert unit retains more of the opening but reduces dimensions and depends on a sound frame and correct water management. Complete replacement removes the old frame and offers greater control over integration with the wall, but it causes more disruption and can expose concealed damage.
Building Science Corporation describes a spectrum from rehabilitation and storm windows through sash modification, sash replacement, inserts, and complete replacement. Compare the least invasive option that actually addresses the documented failure; do not jump directly from peeling paint to full-frame replacement.
Repair-versus-replacement decision matrix
- Localized decay + stable frame + known moisture cause: obtain a repair or component-splice scope.
- Several failed components but reusable frame: compare extensive repair with sash replacement or another partial intervention.
- Widespread frame decay or failed wall connection: request evaluation of the rough opening and full replacement detailing.
- Historic or distinctive window: document significance and test a representative repair before approving broad replacement.
- Energy or comfort is the main complaint: compare weatherstripping, storm windows, glazing/sash options, and air sealing; deterioration alone does not describe energy performance.
- Cause of wetting remains unknown: pause both repair and replacement decisions until the water path is investigated.
A sample repair can reduce uncertainty on a multi-window project. It reveals achievable appearance, labor, component survival, and whether the repaired unit meets the project’s operating or performance goals. Use the result to revise quantities rather than extrapolating from the worst window.
Common wrong turns
- Calling a window rotten based only on peeling paint or staining.
- Filling soft wood without stopping the moisture source and removing unsound material as required by the repair system.
- Replacing every window because one sill or sash is severely damaged.
- Comparing a minimal replacement quote with a comprehensive repair scope, or vice versa.
- Treating energy improvement as proof that the existing frame is beyond repair.
- Ignoring how an insert or full replacement will manage water at the frame-to-wall connection.
Safety limits and reasons to stop
Older painted windows may contain lead, and renovation can create hazardous dust. Follow applicable federal, state, and local requirements and use a lead-safe professional where required. Do not sand, heat, or dry-scrape an unknown old coating merely to inspect it. Some older glazing or sealant materials may also require specialist handling.
Stop DIY inspection when access requires a ladder or leaning outside, glass is cracked or loose, a sash will not remain supported, decay affects a structural connection, or opening the assembly could expose concealed wall damage. Fungicides, preservatives, consolidants, and epoxies have product-specific hazards and preparation requirements; follow their current instructions rather than an old generic recipe.
What to request in comparable quotes
Give each contractor the same window schedule and ask the quote to identify:
- the moisture source they believe caused the damage and how it will be corrected;
- which sills, rails, stiles, jambs, glazing areas, and hardware will be retained, repaired, spliced, or replaced;
- how concealed deterioration will be handled and authorized;
- how glass, finishes, occupants, landscaping, and the opening will be protected;
- how water will drain after the work;
- what evidence would change the proposed scope after work begins.
Photographs, component counts, and a sample repair give you a better basis for comparison than a single whole-window condition label. Costs, product availability, code requirements, and preservation rules vary, so this worksheet supports a decision but does not replace an on-site specification.